
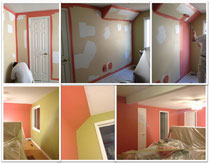
Pics from top left to bottom right:
Cutting in around ceiling, door, baseboard trim;
Primed patches and cutting in
Rolling out from right to left
Finished painting two toned walls
Ceiling cut lines and painted trim
Finished room including trim.
NOTE: Furniture in centre of room covered in 3mm plastic.
DIYers will take on projects themselves for multiple reasons, perhaps for practical reasons like saving money, or to create a shared experience, or to try something new and thereby gain a sense of accomplishment. If you’re not motivated by any of the above, consider hiring a professional to do the work. For those of you in the aforementioned categories, here are some helpful tips on how to paint a room:
1. Clear the way! Move furniture to the centre of the room or if possible out of the room – you will need at least 3 feet of working room around the perimeter.
2. Clean up! This is a good time to vacuum up the dust bunnies and dust off the top of the baseboard trim or skirting. TIP: Use the vacuum brush attachment, it works great.
3. Protect! Ensure your belongings are safe and protected. Drape plastic over the furniture in the middle of the room (3mm plastic is all you need). Purchase drop sheets - I prefer the 4’x12’ canvas/plastic backed runners – and cover the perimeter floor (when you’re done, fold them up and reuse them on your next project). NOTE: You can also by a roll of dry sheeting (thin paper) that can be easily rolled out and held in place with painter’s tape. This is an excellent way to protect your hardwood floors
4. Caulk is Cheap! Inspect your doors and window frames along with the baseboard skirting or trim. If you see a crack or gap between the edge of the trim and the wall, fill it with a fine bead of caulking. TIP: Use a dripless caulking gun; it will make the work much easier, have a small bucket of water and sponge on hand to wipe up any excess caulking off your hands. Work clean!
5. Fill Holes! This is where most DIYers get intimidated. Don’t! Think 2 thin coats! One is never enough. I prefer DryDex (pink dries white) for the small jobs. It dries fast and sands smooth. TIP: Before filling a hole, use a screwdriver handle to ‘dimple’ the surface where the hole is. (Press into the wall). Before adding your second coat of DryDex, lightly scrape any highs off your original patch, and then hit the patch again with another coat of DryDex.
6. Sand and Buff! This is an important and much forgotten step. Using a sanding block and 150 grit sand paper, sand down your newly filled holes until smooth. Do this for every patch. DON’T STOP THERE! Using a poll sander and lightly sand/scuff/buff the entire wall surface. TIP: This is not a heavy sanding, it is a light buff to remove any imperfection in the wall and it also serves to open the pores of the existing paint/surface coating. You get to vacuum and clean up AGAIN! Most paint suppliers say, the surface should be dust free for best results, you can dry mop the walls if you see fit.
7. Prime! Every surface is different, so making a ‘general rule’ as to prime or not to prime (see other blog post) is difficult. If you use a paint/primer in one, ‘spot prime’ the new patches with the same topcoat paint you’ll be using. If not, purchase 1L/1Q of primer and SEAL your patches, otherwise they may ‘flash’ on the wall. (you’ll see the patch through the top coat) If you spot prime or prime, ensure you follow the dry times as outlined by the manufacturer.
8. Ceiling then Walls! If you decided to paint the ceiling, do it first! Cut in along the ceiling/wall joint with a paint brush as your roller won’t get in that close. Then roll it out. Apply two coats for best results, following dry times as directed by the manufacturer.
9. Cut in! Once your ceiling is dry, it’s time to cut-in your walls. This is the second challenging part for DIYers. We use the term cutting in to describe the process of brushing paint around the perimeter of a wall. (Along the ceiling, corner and baseboard/skirting joint). TAKE YOUR TIME! I prefer to use a 2 ½” Sash brush (cut on an angle) to cut in with. I start at the ceiling to wall joint. My first stroke is about 1” below the joint – I like to unload my brush safely below the joint and create runway of paint to work along. I usually work in 12-16” lengths across the wall, reaching out in front of me and pulling my brush towards me. Once my brush is unloaded, I now go back and using the same paint and push a thin bead of paint into the ceiling to wall joint. Avoiding the ceiling by turning my brush sideways along the wall. I then paint both sides of the corner bead about half way down. I do this all the way around the room, then come back and paint the baseboard skirting and finish the corner bead. I use the same technique along the baseboard trim, I unload the brush about 1” above the trim board, then go back and push a light bead of paint into the trim joint. This technique saves time and ensures a quality line.
10. Rollin’ Rollin’ Rollin! It’s finally time to roll out your wall. Painters like to work in a continuous motion around the room, usually from right to left. Many DIYers are told to use a W pattern to unload the roller and ‘fill in’ the shape when you’re rolling. I’ve seen all kinds of patterns! (insert happy face here) I prefer to unload my roller in a ‘check mark’ formation – middle of the wall, down, then up while only filling in two full widths of my roller at a time before I reload. TIP: If you’re uneasy using a roller, don’t worry. Roll out some paint on the wall, and follow that up by lightly going over your strokes with a light check roller stroke. This helps eliminate any fat edges left from the roller.
11. Two Coats! This means you repeat steps 9 & 10. I’ve been painting for a good number of years now and have yet to truly see a one coat paint finish. I ALWAYS apply two coats – yes, one coat would be nice, however, to a trained eye, it is usually insufficient. Perhaps white over white, but usually there are sheen variances that become visible when dry. So beware! Do it right – apply two coats!
12. Trim! After your walls have been painted, it’s time to paint the trim. If you’re not confident in creating straight lines, allow the wall paint to dry sufficiently, then use painter’s tape to mask off the wall to trim/frame joint. This will make your job easier and your lines straighter. TIP: If you use painter’s tape, I paint then remove the tape IMMEDIATELY. Only press the tape firmly to the surface along the joint, leave the rest of the tape loose to avoid damaging the wall paint.
13. Reset your room! If you’re still reading up to this point, I’m impressed! It means you care to be informed, well done! Let the paint dry according to the manufactures specifications, once dry, reset your room. NOTE: If you are using a ZERO VOC paint you can inhabit a newly painted space more quickly, but in general, let the space air out before reoccupying.